Project Overview
This project demonstrates a comprehensive cloud-native approach to deploying a full-stack web application using modern DevOps practices. The application features an Angular frontend hosted on AWS S3, with a Spring Boot backend running on Amazon EKS (Elastic Kubernetes Service), and data persistence managed through Amazon RDS.
Repositories Involved
- Frontend: https://github.com/srngx/project-frontend
- Backend: https://github.com/srngx/project-backend
- Terraform Infra: https://github.com/srngx/project-infra
Architecture
Infrastructure Components
- Frontend: Angular application hosted on AWS S3
- Backend: Spring Boot application deployed on Amazon EKS
- Database: MySQL on Amazon RDS
- CI/CD: Jenkins pipelines for automated deployment
Technology Stack
- Frontend: Angular, HTML, CSS, JavaScript
- Backend: Spring Boot (Java)
- Database: MySQL
- Infrastructure: AWS (S3, EKS, RDS)
- DevOps Tools: Jenkins, Docker, Kubernetes, Terraform
- Version Control: Git with feature branch workflow
Key Implementation Highlights
Infrastructure as Code
The project utilizes Terraform to provision and manage the AWS infrastructure, enabling reproducible deployments and infrastructure version control.
Containerized Backend
The Spring Boot application is containerized using Docker and deployed to Kubernetes, providing scalability and resilience.
Automated CI/CD Pipelines
Separate Jenkins pipelines handle the build and deployment processes for both frontend and backend components:
- Backend pipeline: Code pull, Maven build, Docker image creation, and Kubernetes deployment
- Frontend pipeline: Code pull, npm build, and S3 deployment
Branching Strategy
The project implements a structured branching strategy with feature, development, and main branches to support collaborative development and controlled releases.
Deployment Process
- 1. Infrastructure provisioning with Terraform
- 2. Database initialization and schema setup
- 3. Backend service deployment to Kubernetes
- 4. Frontend application build and deployment to S3
- 5. Configuration of network connectivity between services
Project Benefits
- Scalability: Kubernetes orchestration allows for easy scaling of backend services
- Cost Efficiency: Serverless frontend hosting minimizes infrastructure costs
- Automation: CI/CD pipelines reduce manual deployment effort and potential errors
- Maintainability: Separation of concerns with distinct repositories for frontend and backend
- Resilience: Load-balanced backend services ensure high availability
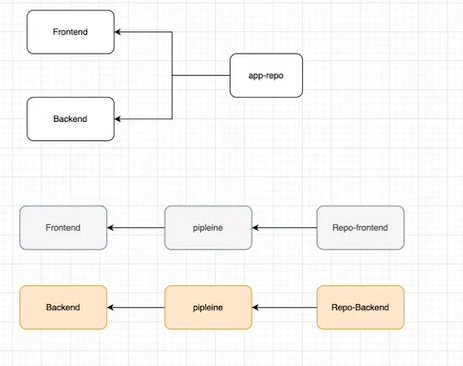
Project Workflow
Frontend and backend will have their own seperate repository and pipelines and both pipelines should be executed with jenkins.
Step 1: Launch Infra with Terraform
Clone this repo either in your local or ec2 instance where terraform is installed and setuped.
git clone https://github.com/srngx/project-infraterraform apply --auto-approveThis will launch eks cluster, RDS db and S3 bucket.
Step 2: Import the database into RDS db.
After 15 resources gets created successfully you can import the database into newly created RDS db instance.
git clone https://github.com/srngx/project-infra.gitHere you can find springbackend.sql file import it to database
mysql -h -u admin -p springbackend < springbackend.sql Login to database to Verify if the database is successfully imported
mysql -h -u admin -p show databases;
use springbackend;
show tables;
Step 3: Create Repository for Project backend
1. Goto github.com and create new repository for storing backend files
2. upload the backend file from this repository to yours
https://github.com/srngx/project-backend.git
after pushing code to main in your github repo
3. Create two new branches in your github repo
- dev branch
- feature branch
switch to feature branch and create new file Dockerfile
FROM openjdk:17-jdk-slim
COPY target/*.jar /opt
EXPOSE 8080
CMD java -jar /opt/spring-backend-v1.jar
Create new Directory `deploy` and put kubernetes manifests files
deployment.yaml
apiVersion: apps/v1
kind: Deployment
metadata:
  name: backend-app
  labels:
    app: backend-app
spec:
  selector:
    matchLabels:
      app: backend-app
  replicas: 2
  template:
    metadata:
      labels:
        app: backend-app
    spec:
      containers:
        - name: backend-app
          image: /spring-backend:latest
          ports:
            - containerPort: 8080
services.yaml
apiVersion: v1
kind: Service
metadata:
  name: backend-app
spec:
  selector:
    app: backend-app
  ports:
    - protocol: TCP
      port: 8080
      targetPort: 8080
  type: LoadBalancer
and lastly create `pipeline.groovy` in root of repo
pipeline {
    agent any
    stages {
        stage ('code-pull') {
            steps {
                git branch: 'dev', url: 'https://github.com//project-backend.git'
            }
        }
        stage ('code-Build') {
            steps {
                sh 'mvn clean package'
            }
        }
        stage ('Deploy-k8s') {
            steps {
                sh '''
                    docker build . -t archsarangx/spring-backend:latest
                    docker push /spring-backend:latest
                    docker rmi /spring-backend:latest
                    kubectl apply -f ./deploy/
                '''

            }
        }

    }
}
and push to code to feature branch
In github create pull request to merge the feature branch into dev branch
accept the pull request
Step 4: Install Prerequisitics
Install maven
sudo apt install maven -yInstall and configure Kubectl
curl -LO "https://dl.k8s.io/release/$(curl -L -s https://dl.k8s.io/release/stable.txt)/bin/linux/amd64/kubectl"sudo install -o root -g root -m 0755 kubectl /usr/local/bin/kubectlInstall docker
sudo apt install docker.io -ysudo systemctl enable --now dockerInstall aws-cli
sudo apt install unzip -y
curl "https://awscli.amazonaws.com/awscli-exe-linux-x86_64.zip" -o "awscliv2.zip"
unzip awscliv2.zip
sudo ./aws/install
Configure aws-cli
aws configure --profile Create aws cli user from aws web console and add ID and secret key
Update Kubeconfig
aws eks update-kubeconfig --name --region your-region --profile 
Now after all these dotfiles created in home in order to jenkins able to use them we should move them to jenkins user directory
Move all config files to jenkins directorycp -R .aws .kube /var/lib/jenkinschown -R jenkins:jenkins /var/lib/jenkinsgpasswd -a jenkins dockerStep 5: Start Jenkins Server in EC2
Launch Ec2 instance for our jenkins server here all our programs (kubectl, maven, jenkins, aws-cli, java) will be configured
Launch EC2 install of following specifications:
- Ram: 8GB
- Storage: 40 GB
- CPU: at least 2
This could be t2.large
Install Jenkins:
Jenkins require java to run
apt install openjdk-17-jdk -yInstalling commands taken from offician documentation of jenkins make sure to recheck for any updates
sudo wget -O /usr/share/keyrings/jenkins-keyring.asc \
  https://pkg.jenkins.io/debian-stable/jenkins.io-2023.key
echo "deb [signed-by=/usr/share/keyrings/jenkins-keyring.asc]" \
  https://pkg.jenkins.io/debian-stable binary/ | sudo tee \
  /etc/apt/sources.list.d/jenkins.list > /dev/null
sudo apt-get update
sudo apt-get install jenkins
Launch Jenkins Service
systemctl enable --now jenkins
This will enable the jenkins service and start it.
Visit the jenkins server
`https://
(make sure you enable port 8080 in security groups for outside access)
Add some plugins in jenkins
Create new Item in jenkins and create pipeline for `backend deployment`
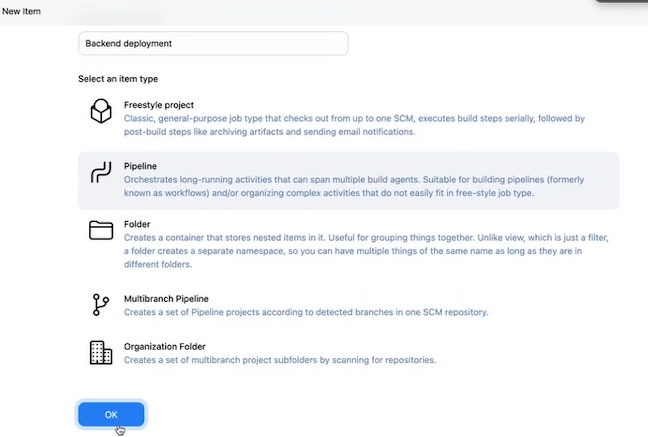 ![[]]
![[]]
for Definition select Pipeline Script from SCM
add repository url for github project backend repo that you have created
give the name of the branches as dev
and scriptpath be pipeline.groovy
save and apply and try to run the file
ofcourse you gonna get error in pipeline because we havent added database endpoint in backend source code yet.
Database connection
In order to make communication between backend and database you need to establish connection by providing credential of database to backed source code.
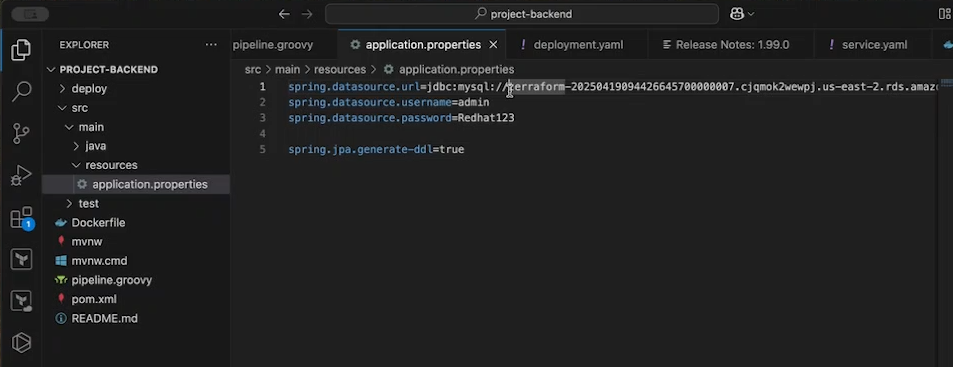
Locate the database connection file
Its in src/main/resources/application.properties
make appropriate changes here and push the latest code to github repository and rerun the pipeline.
After successful running of pipeline check for pods and endpoint of loadbalancer to access the backend url

kubectl get pods
kubectl get svc
That url should show this whitelabel error it means its working correctly.
Step 6: Frontend Deployment
We are going to use same git branch strategy for frontend deployment as well.
Create a new repo in github for frontend.
copy the source code from here
git clone https://github.com/srngx/project-frontend.gitalso we need to install nodejs and angular in instance.
sudo apt install nodejs npm -ysudo npm install -g @angular/[email protected]push the code into github repo
create two branches
- dev
- feature
now create a pipeline file in this repo
create new file pipeline.groovy
pipeline {
	agent any
	stages {
		stage ('code-pull') {
			steps {
				git branch: 'dev', url: 'https://github.com/your-username/project-frontend.git'
			}
		}
		stage('code-build') {
			steps {
				sh '''
					npm install
					ng build
				'''
			}
		}
		stage('code-deploy') {
			steps {
				withCredentials([aws(accessKeyVariable: 'AWS_ACCESS_KEY_ID', credentialsId: 'aws-creds', secretKeyVariable: 'AWS_SECRET_ACCESS_KEY')]) {
	sh '''
		aws s3 cp --recursive dist/angular-frontend s3://your-bucket-name
	'''
}


			}
		}
	}
}
Step 7: Configure and deploy
Add loadbalancer endpoint in source code
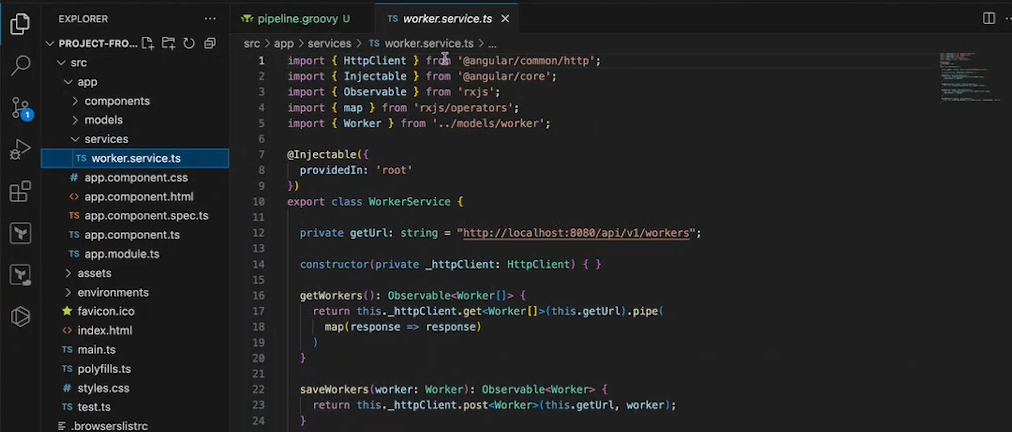
In your frontend code locate /src/app/services/worker.service.ts
and in
private getUrl: string = "http://localhost:8080/api/v1/workers";and your loadbalancer endpoint
"http://:8080/api/v1/workers"; Save changes and push to the repo in dev branch
Add aws credential in jenkins
Add aws credential plugin
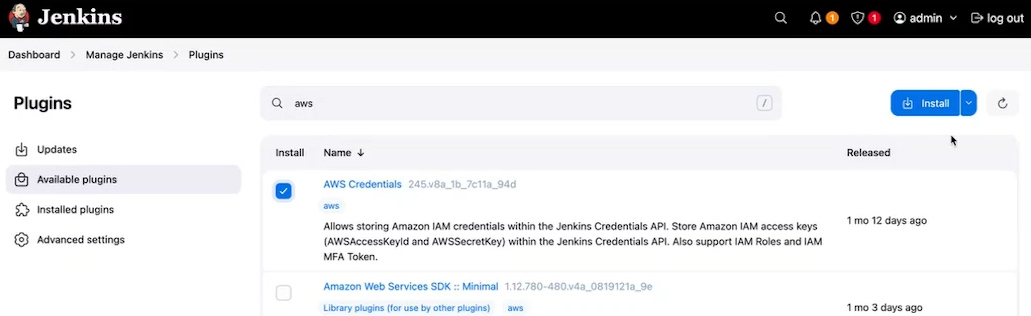
Goto manage and add global credentials
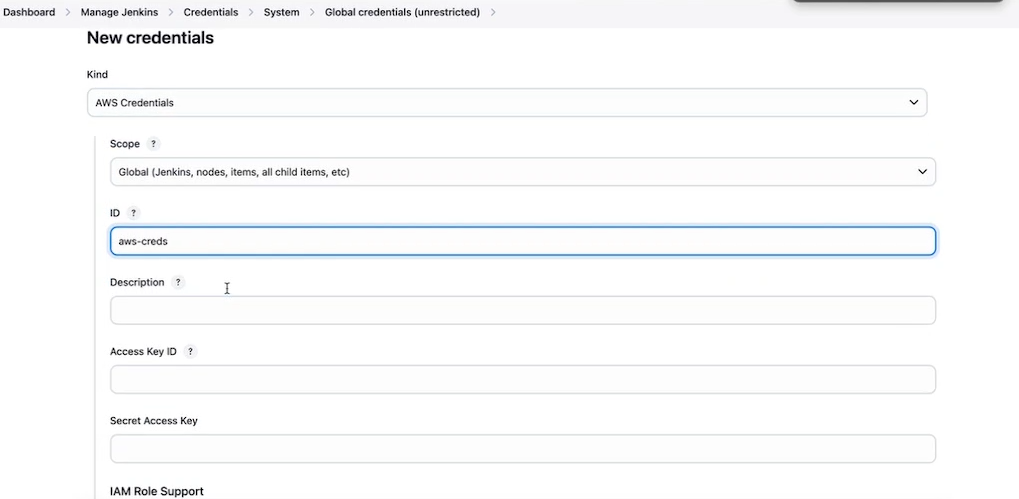
Now in generate syntax you can get aws credential option
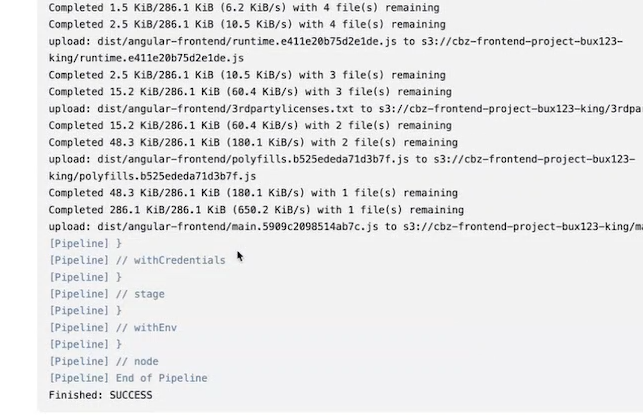
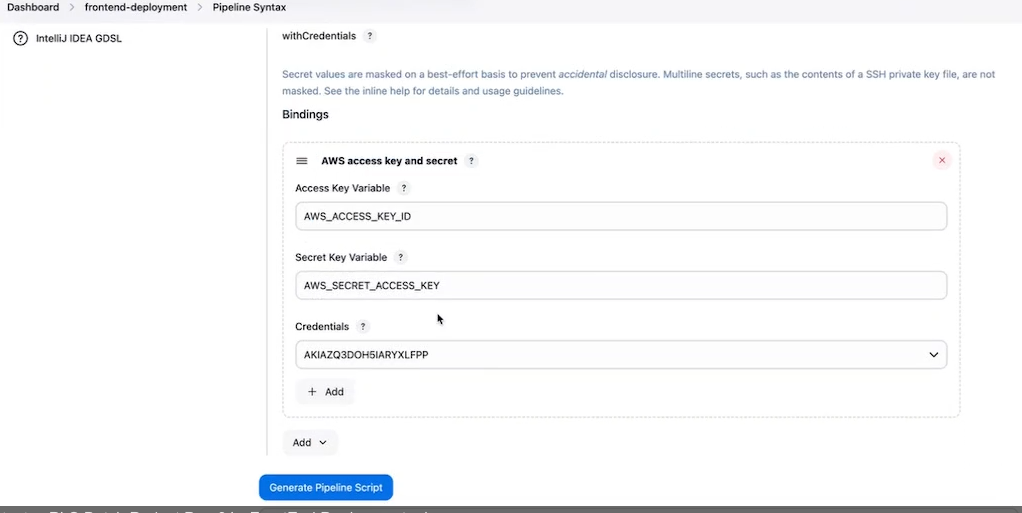 Create pipeline and deploy
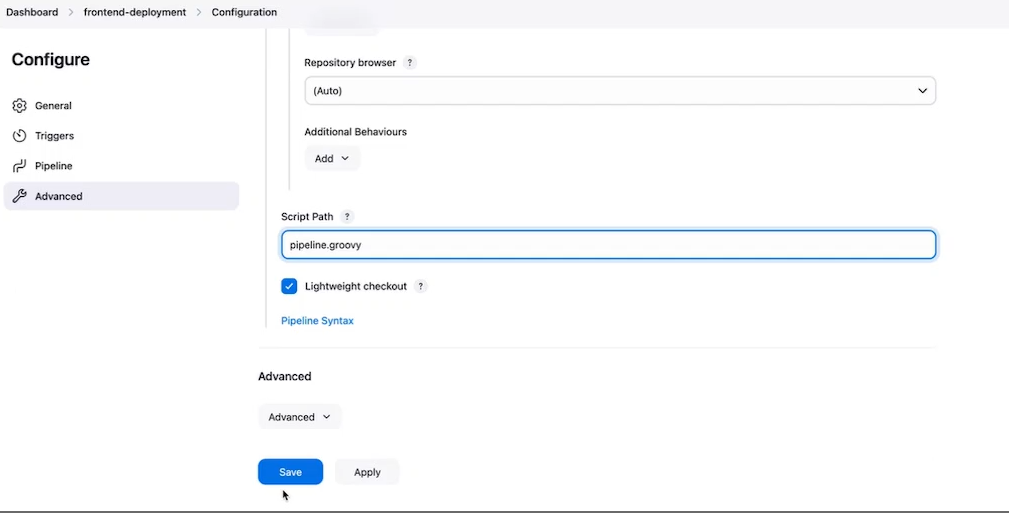
Now pipeline should be finished successfully.
Access s3 bucket url it should see page like this
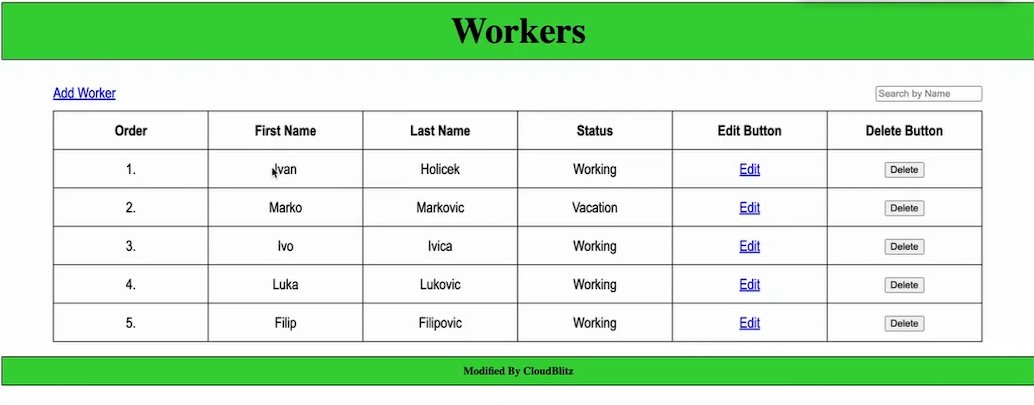
You can try adding removing data from table and it should reflect in mysql database as well.
Thanks for Reading!